What is Windows 10 blue screen on boot?
Windows 10 blue screen on boot is an error that usually occurs due to errors in drivers, registry corruption, bad random access memory (RAM) or bad hard drive.
How can you fix Windows 10 blue screen on boot?
Some of the solutions to this error include uninstalling the corrupt driver, testing the hardware, fixing the registry, and reinstalling Windows.
Please see our in-depth walk-through solutions below.
1. Uninstall the corrupt driver and Windows Update
“Windows 10 blue screen on boot” could be due to a newly installed driver or Windows Update. The driver could be incompatible with your current hardware or with your Windows 10 version. While for the update, it is possible that the update has a flaw or is also incompatible with your hardware. To solve the problem remove the update or driver using Safe mode. To boot into Safe mode, boot to the Windows 10 installation disc or USB and follow the guide below.

Option 1.
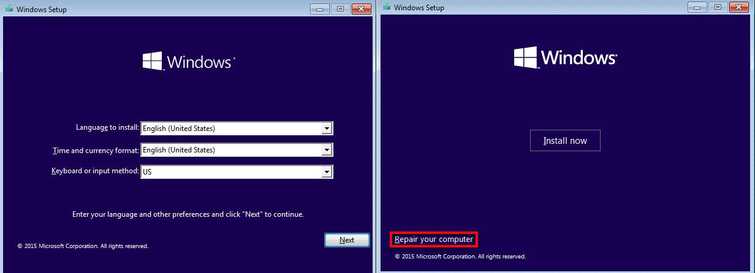
- Boot to Windows 10 installer.
- In the Windows Setup window, click the Next button.
- In the lower left side click Repair your computer.
- In Advance Option, follow this sequence Troubleshoot >>Advance Option >> Start up Setting>> Restart.
- In the Startup Settings select Safe mode.
- In Windows Desktop Safe mode, go to Control Panel and select Uninstall program.
- Driver: Uninstall all drivers that were installed.
Update: Click View installed updates, uninstall the recent update. - After removing the driver or update, restart the PC.
Option 2.
https://youtu.be/NWZ2-rYIiHQ
2. Test Hardware
“Windows 10 blue screen on boot” may also be due to faulty, semi-detached or dusty hardware. Dusty hardware, causing “Windows 10 blue screen on boot” could be caused by overheating component due to lack of air flow. Therefore, cleaning is a must. While for failing hardware, if Windows detects hardware is failing it automatically send a blue screen to avoid further damage to the other components. Also, if a component is loose Windows will detect it as defective too. Reconnecting the components after cleaning may fix the error. If nothing change, test the hardware one by one by connecting the component to a working PC. If a component failed on the following test below, it could be the cause
GPU test
https://youtu.be/RbR3AhXYPUY
Memory Test
https://youtu.be/Gjbek2KZ7t8
Hard disk drive Test
https://youtu.be/BN4uwBDdcU8
Other components
https://youtu.be/9i3y0fuP8cw
3. 3
. Fix registry"Windows 10 blue screen on boot" may also occur due to a corrupt or missing registry. It may be caused by a conflict driver, accidentally change or delete registry or a third-party software malfunction. Resetting Windows 10 to its original form may help fix the blue screen on boot. Warning, all install third-party software will be uninstalled.
- Boot to Windows 10 installer.
- In the Windows Setup window, click the Next button.
- In the lower left side click Repair your computer.
- n Advance Option, follow this sequence Troubleshoot >> Reset this PC >> Keep my File (to protect important data).
- This process may take longer depending on your PC spec.
See Solution 1 video start at 1:26 for a video tutorial Resetting Windows 10,
4. Reinstall Windows
If all the components are in good condition, "Windows 10 blue screen on boot" could be caused by your Windows, which is unfixable. Reinstalling Windows may fix the error.

- Insert the Windows installation DVD or USB.
- A message will appear “Press any key to boot from CD or DVD”, press any key to boot from the Windows installation CD/DVD or USB.
- Select your language, time and keyboard, and click "Next."
- Click Install Now.
- Click I accept the terms of the license, and then click Next.
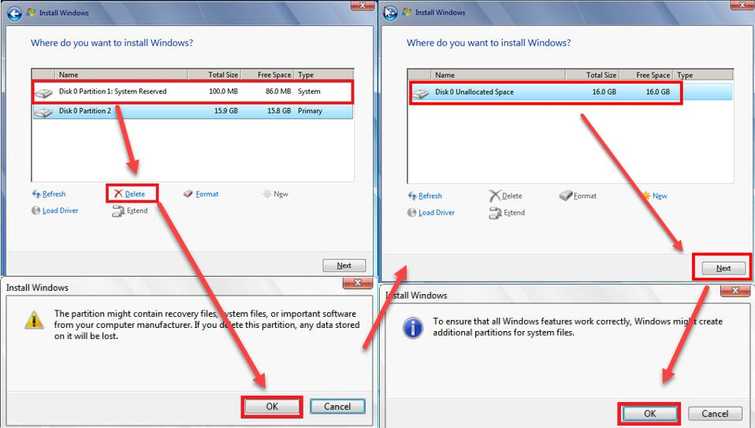
- Click Custom (Advanced).
- Select the partition, and click Delete.
NOTE: Delete all partition. - Select the Unallocated space and click Next. NOTE: If you want to define the size, click new, set the size and then click Apply.
- Click ok to confirm.
- Wait until the installation process is finished.

