What is error message 'Headphones not working' in Windows 10?
Headphones not working in is an error that usually occurs when you can't hear a sound on your headphones after upgrading to Windows 10 or after performing an upgrade. The error may occur if your headphones are not set as your default device, your audio driver is out of date, the Realtek HD Audio Manager is not configured correctly, or you have IDT audio device installed.
How can you fix 'Headphones not working'?
Some of the solutions to this error include:
- Reconnecting the headphones
- Setting the headphones as the default device
- Updating the audio driver
- Setting Windows audio to automatic
Please see our in-depth walk-through solutions below.
1. Reconnect the headphone
"Headphones not working" error in Windows 10 may be caused by a detached headset or when inserted into the microphone female jack. Try to reconnect the headset and make sure it is connected to the audio jack.
2. Set the Headphones Default Device
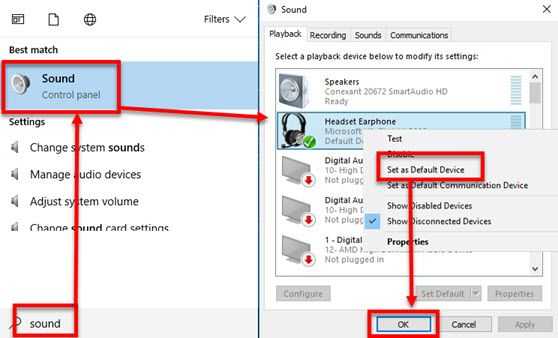
Your headphones might not be set as Default Device for sound, resulting in "headphones not working" error in Windows 10. To set it as default, see steps below.

- Click Windows Start or Windows key + S key.
- Type Sound in the Windows Search bar and press Enter key.
- In the Playback Tab, right-click the headphone and select Set as Default Device.
- Then, press Ok.
- Try your Headphone again.
3. Update Audio Driver
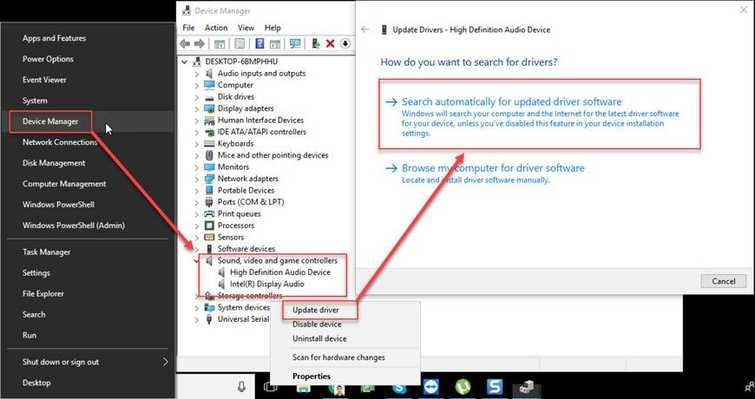
Your audio driver might be out of date, causing the error "problem headphones not working" in Windows 10. Go to device manager and update the driver, it may fix the problem.

Option 1.
- Go to Device Manager, by right-click the Windows Start and select Device manager.
- Expand Sound, video and game controllers.
- Right-click the Audio driver and select Update Driver Software.
- Select Search Automatically for updated driver software
- Restart your computer.
Option 2.
- Go to Device Manager, by right-click the Windows Start and select Device manager.
- Expand Sound, video and game controllers.
- Right-click IDT High Definition Audio CODEC device and select Update Driver Software.
- Select Browse my computer for driver software.
- Then, Select Let me pick from a list of device drivers on my computer.
- Select High Definition Audio Device and then click Next.
- Select Yes in the Update Driver Warning.
- Restart your computer.
4. Set Windows Audio service to Automatic
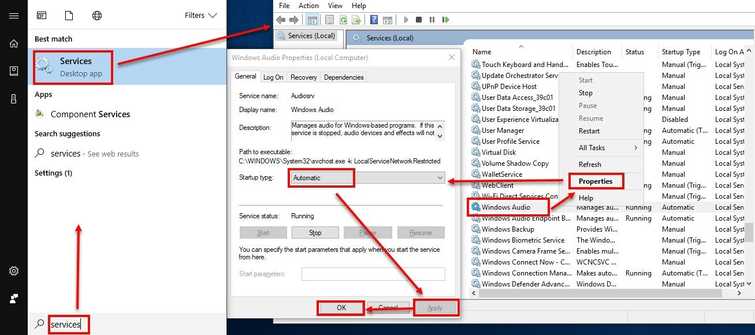
"Headphones not working" error in Windows 10 may also occur if Windows Audio service is disabled. Go to service to confirm if it is disabled. Set it to automatic may fix the problem.

- Click Windows Start or press Windows key + S key.
- Type Services in the Windows search and press Enter key.
- In the Services window, browse for Windows Audio.
- Right-click it and select properties.
- Set Startup type to Automatic, then press Apply and then Ok.
- Restart your computer to apply the setting.

