What is 'Windows Error 193'?
Windows Error 193 usually occurs when installing iTunes or any other Apple software. It stops you from installing or updating iTunes by flashing error 193 along with some other error codes. It refers to an error within Windows, rather than within iTunes.
How can you fix 'Windows Error 193'?
Some of the common fixes include:
- Delete the DLL files
- Reinstall iTunes
Please see our in-depth walk-through solutions below.
1. Delete DLL files
Windows Error 193 may occur when you install or update iTunes and related software such as iCloud. See instruction below on how to repair this problem.
- Go to C:\Windows\System32.
- Look for the following files and delete it.
NOTE: Skip it, If you did not see a copy. Do not delete anything that is not listed below.- msvcp100.dll
- msvcp120.dll
- msvcp140.dll
- msvcr100.dll
- msvcr120.dll
- vcruntime140.dll
- Now, go to control panel. Look for the following.
- Apple Application Support 32-bit
- Apple Application Support 64-bit
- iTunes
- Right-click each of them and select repair.
- Then restart and run iTunes.
Use Solution 2 if you still see an error running iTunes.
2. Reinstall iTunes
Windows Error 193 may occur when you install or update iTunes and related software such as iCloud. You may want to reinstall iTunes and related components.

Step 1. Go to Control Panel to uninstall iTunes and its associated components in the following order:
NOTE: Please make sure to uninstall the software in the following order. Do not restart computer until all software’s are uninstalled.
- iTunes
- Apple Software Update
- Bonjour
- iCloud
- Mobile ME Control
- Quicktime
- Apple Application Support 32-bit
- Apple Application Support 64-bit
- Apple Mobile Device Support
NOTE: On some computers, two versions of "Apple Application Support" is present. Uninstall both.
After uninstalling all software above, restart your computer.
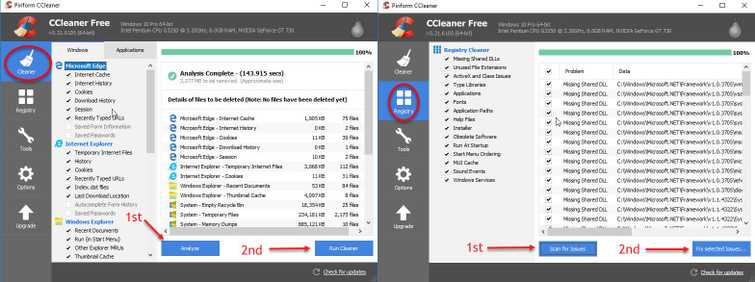
Step 2. To delete all remaining related files, download and install CCleaner.
- Please see download link https://www.piriform.com/ccleaner/download.
- Please see image below for the instruction on how to use CCleaner.
- Next, restart your computer.
Step 3. Checking for remaining unwanted files.
- For 64-bit version of Windows browse to C:\Program Files For 32-bit version of Windows navigate to C:\Program Files (x86).
- Delete iTunes, Bonjour, and iPod folder if you see one.
- Then browse to C:\Program Files\Common Files (64bit) or C:\Program Files (x86)\Common Files (32bit).
- Delete the following folder if its existing Mobile Device Support, Apple Application Support, and CoreFP.
- Right-click the “Recycle bin” and click “Empty Recycle Bin.”
- Restart the computer.
Step 4. Reinstall iTunes and related components
NOTE: If you do not have a Microsoft NET Framework please download and install it first.
- Download and install Microsoft NET Frameworklatest version. Please see the download link here.
- Restart your computer after installation.
- Download and install the latest version of iTunes and the related components.

