What is Hotmail server error 3219?
Hotmail error 3219 is an error that usually occurs when Windows Live Mail (WLM) cannot connect to the Hotmail, Outlook or MSN servers in order to retrieve your mail. The root of the error comes from a double authentication problem, specifically when two types of authentication use the same credentials at the same time. One credential is used for sign-in and the other is used for connecting to the mail server.
The users most affected by this error are those who use WLM to connect and sync mail via through the secure HTTPS link. The error occurs when WLM is overloading and updating.
How can you fix Hotmail server error 3219?
Some of the solutions to this error include setting up the internet message access protocol (IMAP).
Please see our in-depth walk-through solutions below.
1. Set Up internet message access protocol (IMAP)
"Hotmail error 3219" may occur due to a misconfigured Windows Live Mail. Configuring your IMAP may fix the error. Please follow the configuration below.

-
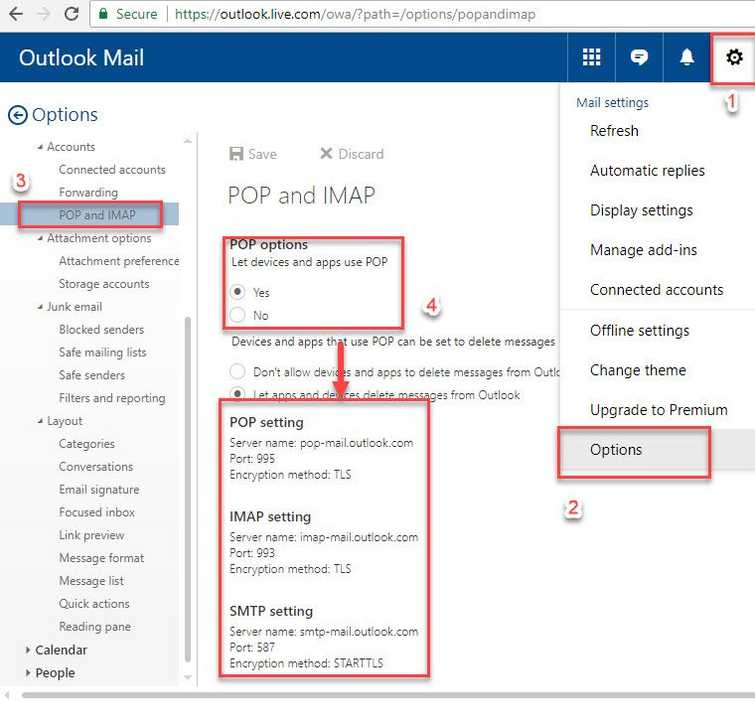
Go to https://login.live.com/ and log in.
-
Click on settings and select option.
-
Select POP and IMAP, then select Yes in the POP option.
-
Run Windows Live Mail.
-
Create an account by clicking Accounts ==> Email and add your account.
-
Input your email address, password and display name for outgoing messages.
-
Select Manually configure server settings and click Next.
-
For the incoming server, select IMAP from the drop-down.
-
For the incoming server address, enter outlook.office365.com and change the port number to 993.
-
Select Requires a secure connection (SSL).
-
For Authenticate using, select Clear text from the drop-down.
-
For Log-on username, enter the full email address.
-
For the outgoing mail server address, enter smtp.live.com and change the port to 587.
-
Select Requires a secure connection (SSL) and Requires authentication.
-
Click Next and Finish.
